

I had many requests for a step by step instruction of making the “Hydraulic Crane”.
Although this wasn’t my construction (one of my brilliant students did this one for a project that I assigned), I can figure out the basics from what I saw.
Note: The following is only meant as a start for anyone that wants to try this project. However, everyone has their own twist to every assignment, every design. Use your imagination to make the crane better, and your own!
Materials:
- 30 mL syringes (x8)
- dialysis tubing (or any other kind of plastic tubing for connecting the syringes together)
- wood (for crane construction and for base)
- anchors (to hold the tubing in place)
- bottle with water (or any other weight to counter balance the crane arm)
- a scoop (any kind of shovel)
- Screws / Nails / Nuts / Bolts
- + Other miscellaneous materials.
Procedure
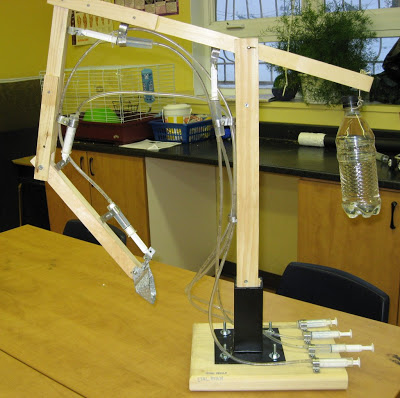
- Connect four stick of wood together so that they form a crane (as in the above picture). Connect them by drilling holes in both sticks of wood, and attach them with long bolts, securing them with nuts. Make sure the wood sticks rotate easily at the connections. (Think of these as hinges in a door.)
- Attach the shovel / scoop to the end of one of the wooden sticks in the same way.
- Secure this crane to a wooden base.
- To counter balance the weight of the crane and scoop you need to hook on a weight (bottle with water) to the opposite side of the crane (see picture above).
- Connect four syringes with four pieces of flexible tubing. Make sure there are no leaks between the syringe and the tube connection. Make sure the tubing is long enough – similar length to your crane (see picture above to understand).
- Fill in these syringe-tubing systems with water.
- Attach another syringe to the other side of the tubing for each of the four syringe-tubing systems.
- Next you need to attach these syringe/tubing/syringes to your crane. Each one of them is operating a motion up and down – so you should put them at the connections (the hinges).
- Secure the syringes and tubing with u-type anchors (as in above picture).
Hope this helps a bit. Have fun!
If you want to get a start up kit or more help, try some of these:
- Smartivity Pump It Move It Hydraulic Crane by PlaSmart Inc. – STEM, STEAM learning, build it yourself experiment: Science, Technology, Engineering, (Arts), and Math, Ages 8 and Up
- Assembly Wooden Excavator Model, DIY Assembled Hydraulic Digger Car Playset Student Science Handmade Toy Educational Experiment Kit Set for Kids Toddler Child(No.2)